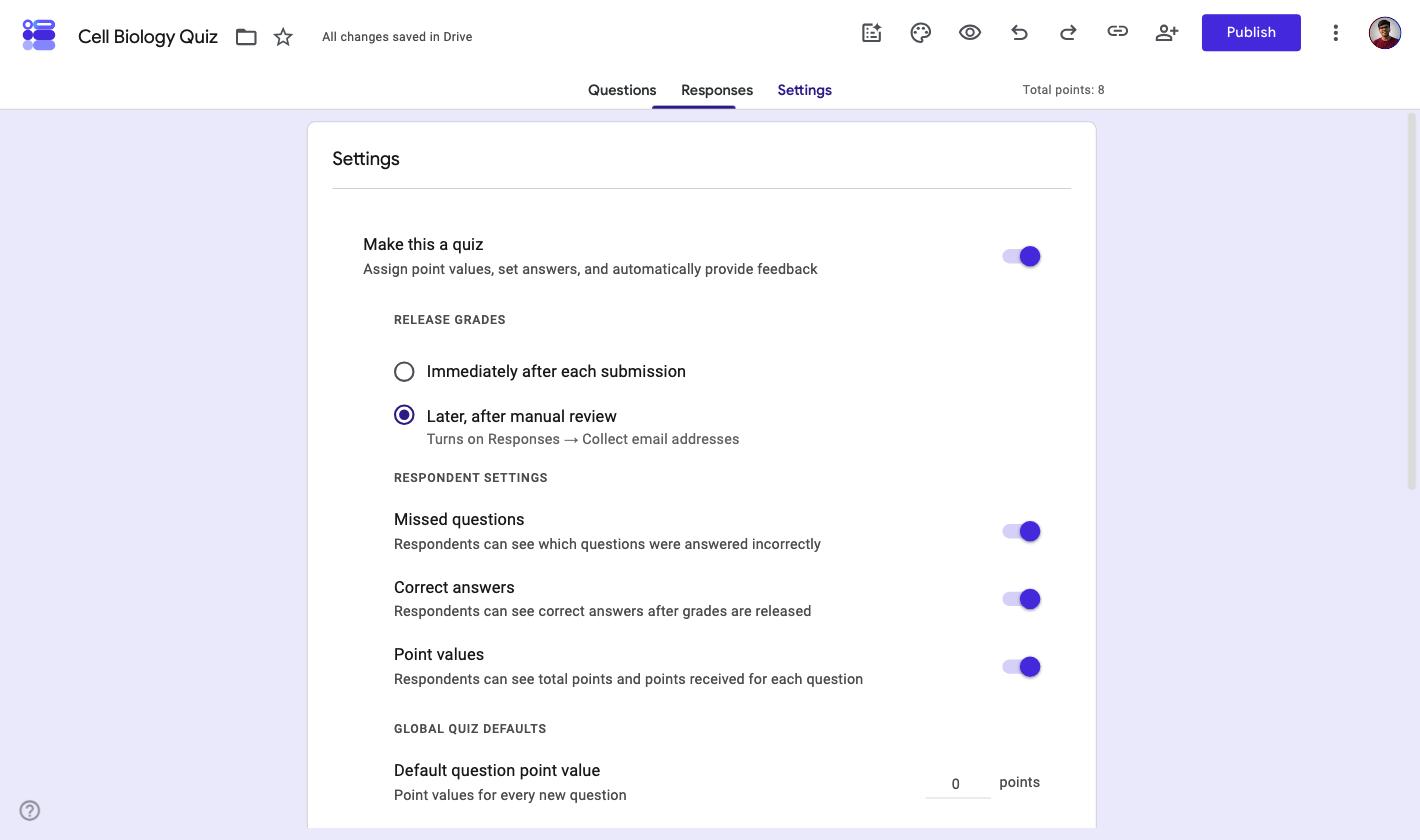
Open Settings, switch on Make this a quiz, then go back to your questions and set an answer key and a point value on each one. Google marks submissions against those keys and totals the score for you.
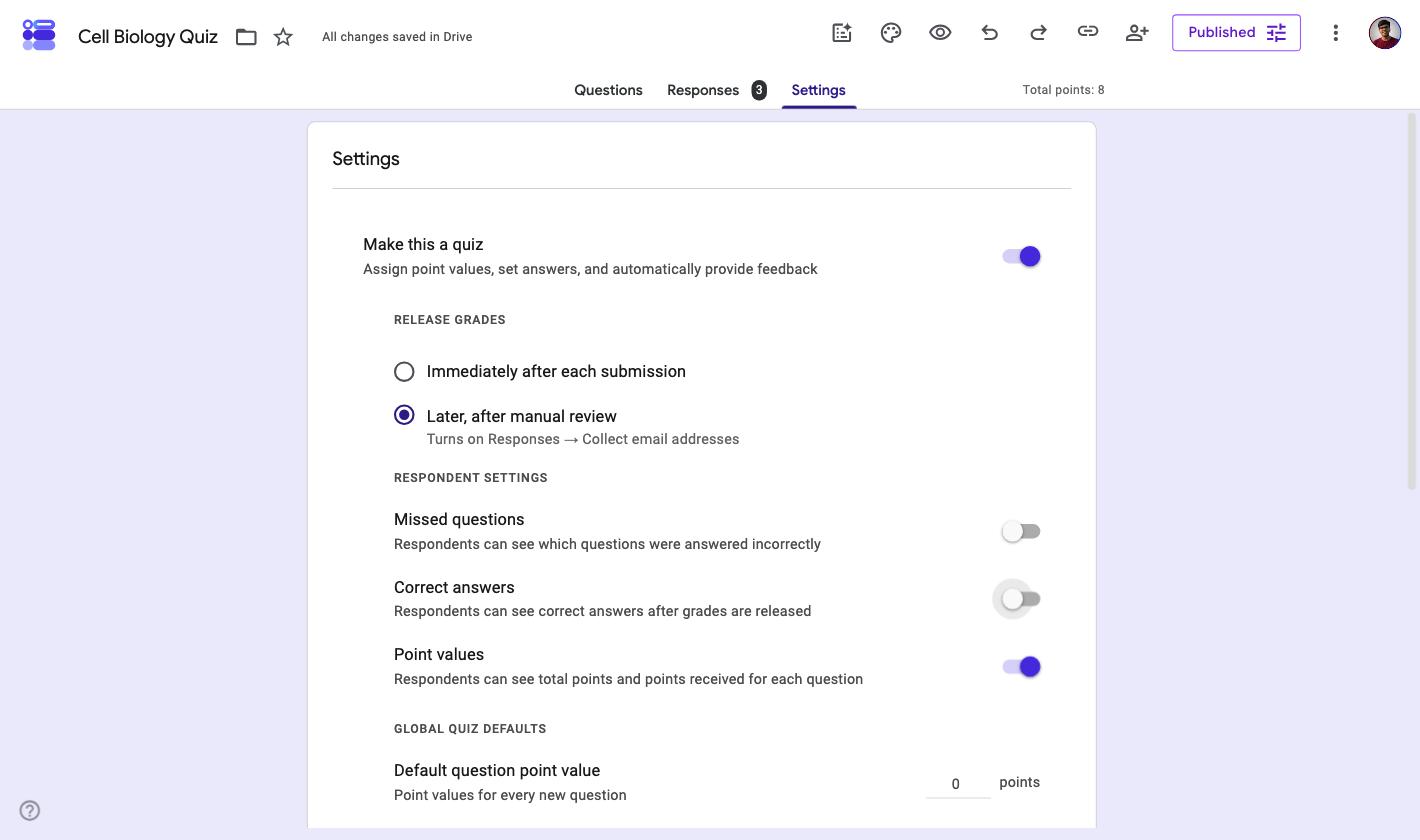
Two settings decide what happens next. Release grades controls whether people see their score immediately or wait for you to send it, and Collect email addresses has to be on if you want to release grades manually.
Honestly, how many weekends have you spent not going out with your friends, and instead,
Taking an online quiz to find out what kind of pizza are you?

Or, have you ever taken one of those career quizzes, which help you determine which career would best suit you?
Or, are you a teacher, who wants to make the most out of E-Learning softwares and tools, using online quizzes, for tutoring and assessing your students?

Regardless of the category you relate to, ever wondered how you can create such quizzes yourself?
Today we discuss, one such platform which enables this, and that platform is…
What a Google Forms quiz actually does
Developed and integrated as a part of the free, web-based Google Docs Editors suite, it is offered by the Big Tech, Google.
Google Forms, as the name itself suggests, is essentially a form builder tool enabling its users to create various kinds of web forms, including surveys, questionnaires, quizzes and more, online and free of cost, to collect, organize, manage and analyze the information they gather.
It has several quality features, making it a popular choice, both amongst business professionals and individual users.

So without further adieu, let's get you started with,
Creating A Quiz Using Google Forms in 6 simple steps
As intuitive and easy to use, as it may seem, the process is deserving of a definitive guide, for both first-time users as well as those looking to create advanced quizzes using more complex features.
Step 1 - Create/Sign-in to your Google account and visit Google Forms
Start by logging in to your existing Google account, or create one if you haven’t already.
Then, click here, to visit the official Google Forms website.

Step 2- Create a New Form
You will see a page as below, after step 1.
At the top right corner, under the Start a New Form Section, click on the plus (+) icon over the Blank Form Template.

You now have a blank form ready to edit.
Step 3 - Form Title and Settings
Click on Untitled Form, and rename it as per a suitable title.
You may also choose to give a little background or description about your quiz.
For e.g., if it's a test, you may brief about the marking scheme as regards the different sections, with the responders best of luck, etc.

Next, in the top header, you'll find three buttons, namely:
- Questions,
- Responses, and
- Settings
Click on the Settings button and toggle the Make this a quiz feature.

You can set up additional settings depending upon the nature or intent of the quiz, such as educational, entertainment, survey, etc.
Step 4 - Adding Questions to Your Quiz
After you've selected the appropriate settings for your quiz, you may switch back to the Question Tab.
By default, there will be an Untitled Question section, which marks the beginning of your quiz questions.
You may start by adding your first question here;
or you may make it into an introductory field asking for the respondent's name.
Pro Tip: You may set some fields as compulsory/required, such as the ones above.

From the drop-down menu (by default showing multiple choice),
You may also set up the kind of response you want to receive, such as short answer, multiple choice, etc.
You also get to upload images, as and when required.

A small Feature Panel on the right side has several other feature buttons.
At the top is again a plus (+) button. This button allows you to Add New Fields to your forms.
Or you may simply click on the Duplicate button to have the same template and edit it as per your next question.
Step 5 - Add your Custom Grading Scheme
Once you've added your questions and answers, you can also add your custom grading system.
In each of the question fields, you'll find an Answer key button. Click on this button to add the correct response.

Choose the correct response.

You may also Add an answer/feedback explaining why a given response was correct or incorrect or any other additional information about the response.
You may also add videos/ video URLs for the same.

Step 6 - Preview and Publish
Once you've added all your questions and their answer keys, click on the eye button in the top header to get a preview of your quiz.
After the preview, just click on the Publish button to publish your quiz.
After you've received submissions, you may head over to the Responses section to analyze your responders' performance.

Under the Responses section, there is a Question Tab, where you find how your responders' have answered each of your questions, while;
The Individual Tab will let you see each of your responders' individual responses.
You also get the option to integrate your responses into a Google Sheets Spreadsheet.
P.S., did you know, you could also add a timer to your Google Quiz!
How scoring works in a Google Forms quiz
Answer keys are available on six question types: multiple choice, checkboxes, dropdown, short answer, paragraph, multiple choice grid. Anything else, including file upload and linear scale, can carry points but cannot be auto-marked.
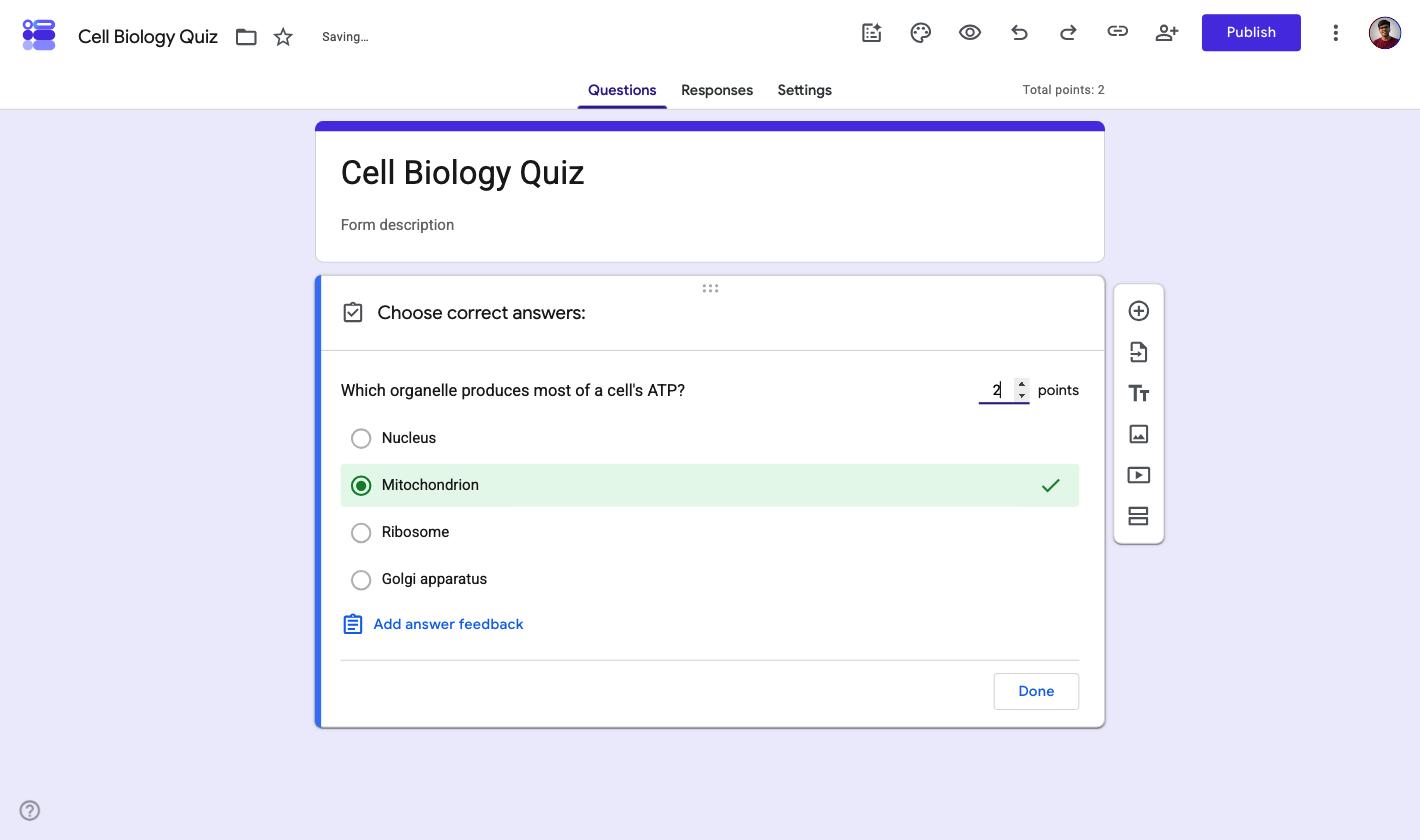
- Points default to zero. A question with an answer key and no point value is marked correct and adds nothing to the total. Set the number explicitly on every question.
- Decimals are discarded. Enter 2.5 points and Google keeps 2. Scale the whole quiz up rather than using fractions.
- Short answer is exact-match. A near miss is left ungraded rather than marked wrong, so someone has to review it by hand. For anything with spelling variation, use multiple choice instead.
- Checkboxes are all-or-nothing. Partial selections score zero. There is no partial credit anywhere in Google Forms.
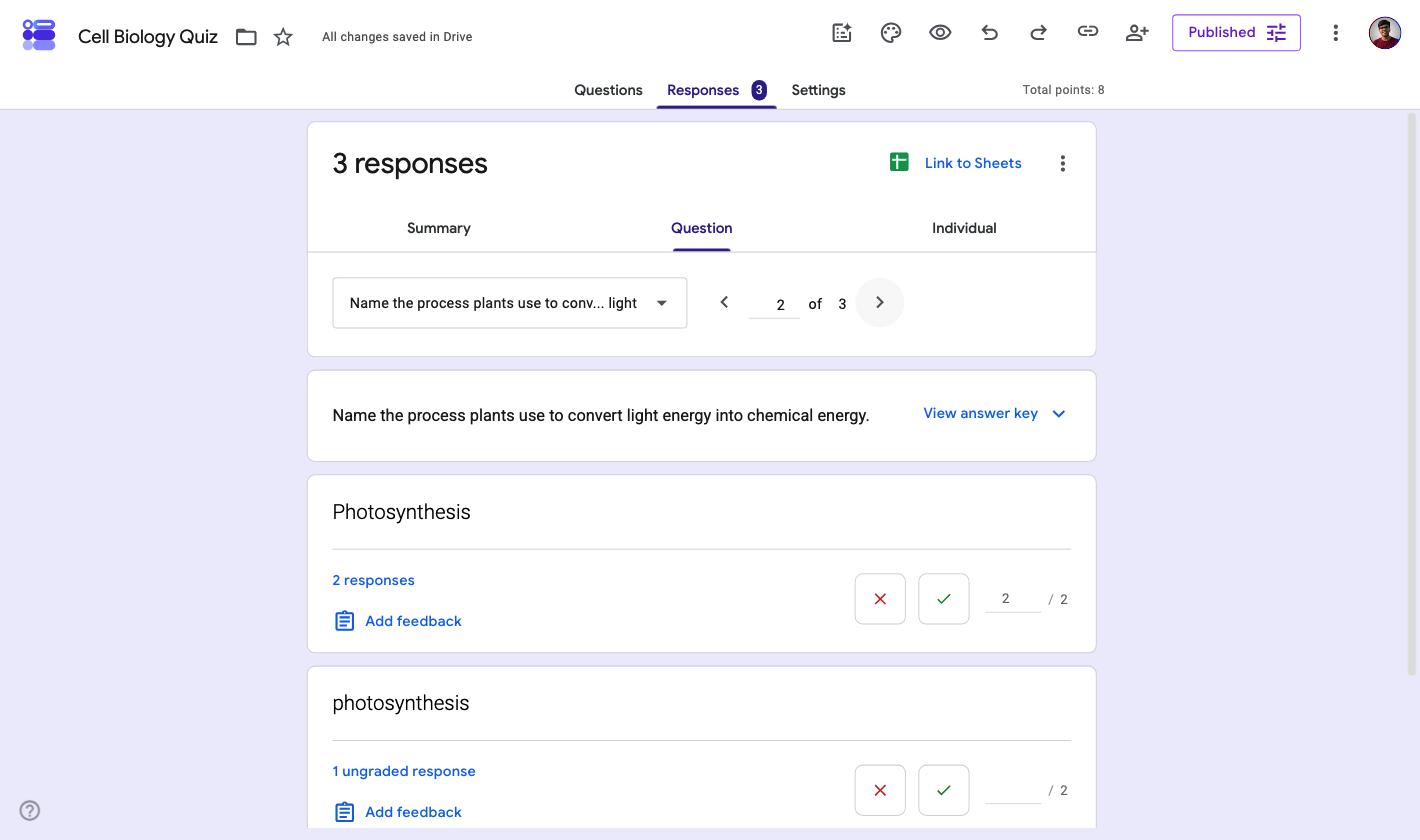
The practical consequence is that a quiz mixing short answer with everything else is not really automatic. It is automatic for most questions and manual for the rest.
Customising a Google Forms quiz
Customisation in Google Forms means presentation, not logic. You can change the header image, the theme colour, the font pairing and the background, and that is the extent of it.
Two things worth setting before you share:
- Question order. Turn on Shuffle question order under Settings if the quiz is being taken in the same room. It does not shuffle answer options, only the questions themselves.
- Feedback per question. Under each answer key, Add answer feedback lets you attach an explanation shown after submission. It is the only place you can teach rather than just mark.
What you cannot do is branch on a score. Forms can send someone to a different section based on a multiple-choice answer, but not based on how many points they have accumulated.
How to share a Google Forms quiz
Click Publish, then copy the link. Since the 2025 publishing change, a form that has never been published returns a "not published" page rather than the quiz, which catches out anyone reusing an old draft link.
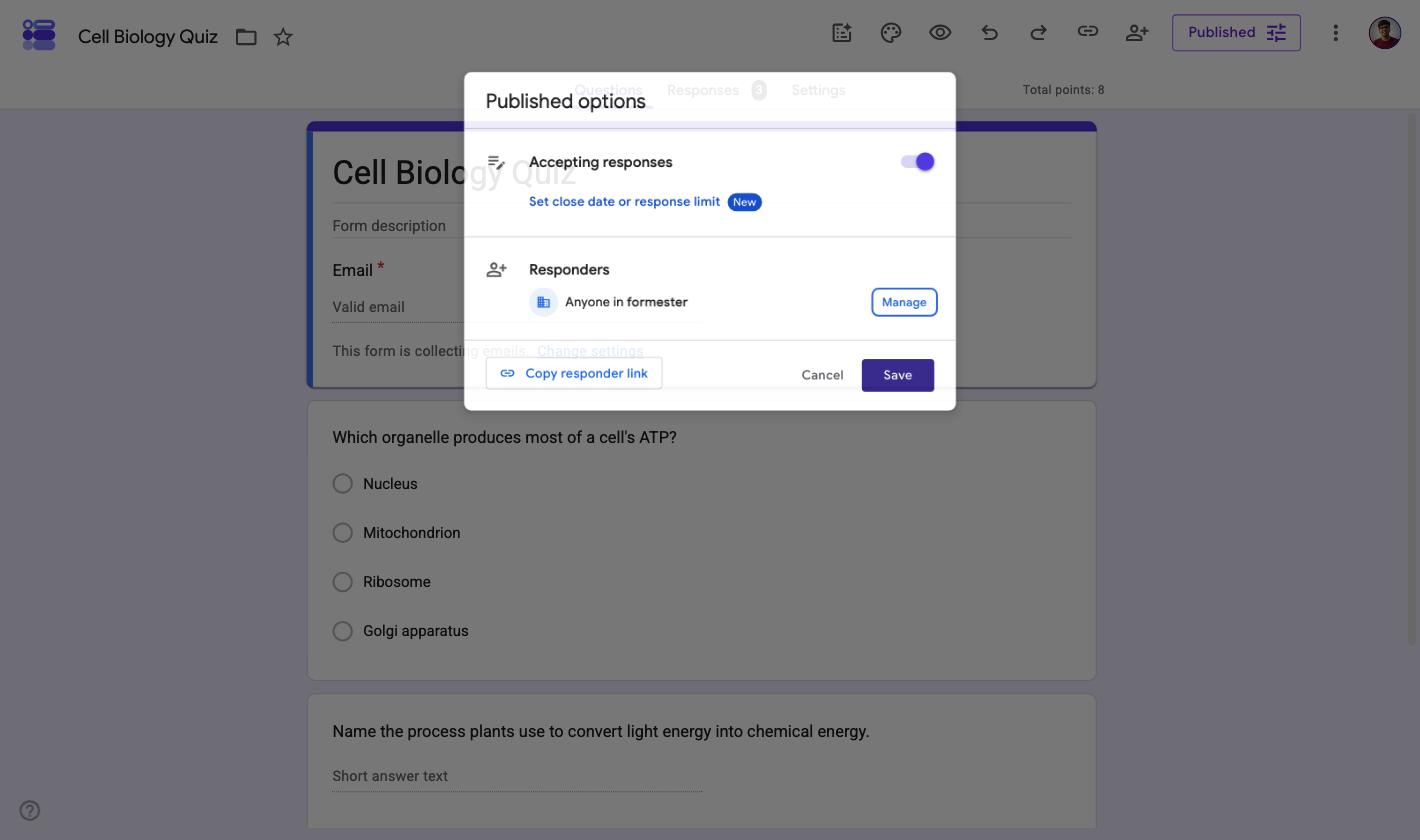
- Link. Shortened with the
forms.gleoption. Fine for a class, awkward in print. - QR code. Not native. Generate one from the published link with any QR tool.
- Embed. The
<iframe>under Publish works, but the embedded form cannot be styled to match the host page. - Restricting who can take it. Only possible by requiring sign-in, which means Collect email addresses set to Verified. On a public quiz that is a wall.
E-Learning And Online Quizzes
Although the pandemic contributed significantly towards the increase of e-learning, the use of virtual platforms and tools, via the Internet, for imparting education isn't just a day-old concept.
Infact, online learning can be dated back to 1982.
According to the World Economic Forum - Even before COVID-19, there was already high growth and adoption in education technology, with global edtech investments reaching US$18.66 billion in 2019 and the overall market for online education projected to reach $350 Billion by 2025.
Having said this, it is evident that diverse efforts are being made to develop softwares, tools, services, platforms, apps and more to facilitate Online Learning.
As a matter of fact, pursuing a childhood education degree online has become more accessible, allowing educators to gain essential skills while adapting to the digital learning landscape.
Google Forms is one such software;
And we want to do our bit, by providing you with
A few tips and tricks that come in handy when creating an Educational Quiz:
- You may assign individual points to each question.
- Toggle the collect email addresses button, so that the email addresses of your responders get recorded.
- You may also allow for the responses to be edited post-submission. However, considering this is an educational quiz, this setting better remains turned off.
- You also have the choice to release results immediately or after manual review.
- Permit file uploads enabling your students to upload their working of a problem, diagrams, etc.
- You can also allow for the responders, to receive a copy of their submissions, always or in the event that they wish to.
- You might also want to limit the submissions to one per user, in order to avoid receiving multiple responses from the same user.
- Also, you can restrict the quiz form to only the users/members of your organization to prevent circulation.
- You can also toggle the shuffle question order so that each student receives a different order.
- Under the Responses section, you also have the option to integrate your responses' analytics into a new or existing Google Sheets Spreadsheet. This will help you in creating your final performance report with ease. For e.g.,
a) You may easily add your mid-semester quiz results to your end-semester/final examination score sheet.
b) You also have the opportunity to judge your students' overall performance as a class, to find out if there is a particular subject/topic, your students seem to struggle with.
Other Alternatives
Whilst Google Forms is a wonderful software for your quiz needs;
If you want to switch to an even easier, drag-and-drop, no-code software, then Formester is your answer.

At Formester, you get a much more straightforward, easy-to-use and effortless interface.
Finding and setting-up, all the necessary settings will be a no-brainer!
What's more, we have pre-designed and customizable templates, all set in place, to get you going, right away!
What Google Forms quizzes cannot do
For a classroom check or a quick internal test, Google Forms is genuinely the right answer and free. Four limits show up once the stakes rise.
- No timer. There is no native time limit on a quiz. Every workaround is an add-on or a script. Our guide to adding a timer to a Google quiz covers the options.
- No partial credit. Checkboxes score all or nothing, and short answer near-misses go ungraded.
- No score-based branching. You cannot route someone to remedial content because they scored 4 out of 10.
- No proctoring or attempt control. Limit to 1 response requires sign-in, and even then it limits accounts rather than people.
If any of those matter, the quiz needs a tool built for assessment rather than a form with answer keys bolted on, or a scored test builder that handles marking natively. Formester can generate a quiz from a prompt and score it, and there is a roundup of quiz tools built for teachers if you want to compare.
Frequently asked questions
Is Google Forms really free to use?
Yes, for any Google account, with no cap on quizzes or responses. Storage is the real limit: file-upload answers consume your Drive quota, and a full Drive stops the form accepting them.
How do I put my name in a Google Forms quiz?
Add a short-answer question asking for it, or set Collect email addresses to Verified so Google records the signed-in account instead. Verified is more reliable because nobody can mistype it, but it forces everyone to sign in.
How do I create a Google Forms quiz with answers?
Switch on Make this a quiz in Settings, then open each question and click Answer key. Pick the correct option and set the point value. Google marks against those keys automatically on submission.
What are the limitations of Google Forms quizzes?
No timer, no partial credit, no score-based branching, no proctoring. Answer keys also only work on six question types, so file uploads and linear scales cannot be auto-marked.
How do I create a Google Forms quiz with multiple questions?
Add each question with the plus icon in the right-hand toolbar, then set an answer key and a point value on every one. There is no cap on how many questions a quiz can hold. If it runs long, use One question per page style sections so respondents are not scrolling a single wall of fields.
How do I share a Google Forms quiz link?
Click Publish, then copy the link from the dialog. Tick the shortener option if you want a forms.gle address. A form that has never been published returns a "not published" page instead of the quiz, which is the usual reason a shared link appears broken.
Does Google Forms have a quiz timer?
No. There is no native time limit on a Google Forms quiz. Every workaround relies on an add-on or an Apps Script, and both stop working if the script owner's permissions change.
Can respondents see their score straight away?
Only if Release grades is set to Immediately after each submission. Set it to Later, after manual review and Google holds every score until you send them, which also forces Collect email addresses on so it knows where to send.
So whether, you want to have some fun with your friends by using a quiz to determine what kind of pizza they are, or create an aptitude test for your career counselling business, or you are a teacher wanting to create an online quiz for your students;
All you have to do, is literally, just sign-up for free and start accessing all the powerful features!


